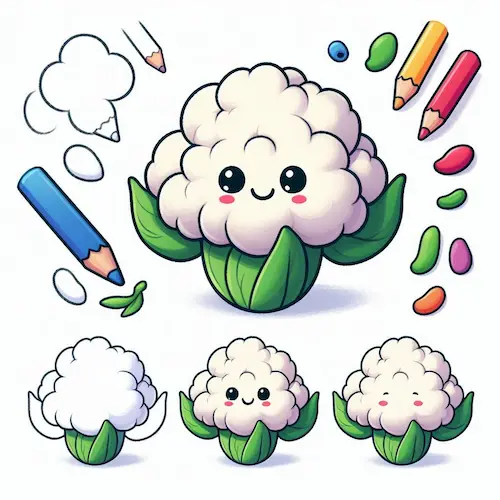
Cauliflower, with its fun, bumpy texture and round shape, is a fantastic vegetable to sketch! Even though it may look tricky at the beginning, figuring out how to draw cauliflower is simpler than you believe! This guide will take young artists through a fun, easy-to-follow process to draw a cauliflower head. By the end of this tutorial, little creators will have a beautiful and realistic cauliflower drawing they can be proud of.
Table of Contents
Things You Need to Start
Here are the essential supplies you’ll require to create a drawing of cauliflower:
Paper: Grab any kind of fun drawing paper!
Writing tool: For drawing the shape of the cauliflower.
Rubber: For fixing any oopsies.
Coloring tools: Light colors like white and cream, along with different greens for the cauliflower’s head and its leaves.
Black Marker (optional): To outline the cauliflower and make it pop!
Ideas for Cauliflower Artwork
You can create various themes around drawing cauliflower to make your artwork more exciting:
Cauliflower in the Garden: Illustrate cauliflower sprouting next to other fun veggies like broccoli and cabbage.
Cauliflower on a Plate: Create a fun and colorful drawing of a tasty dish with roasted or steamed cauliflower served on a plate.
Cartoon Cauliflower: Create a silly face on the cauliflower, making it look lively and whimsical.
Look at the vibrant cauliflower nestled in a basket at a bustling farmers’ market, surrounded by a colorful array of other fresh vegetables!
Step-by-Step Instructions on How to Draw Cauliflower
Let’s dive into the fun process of drawing a super cool cauliflower head!
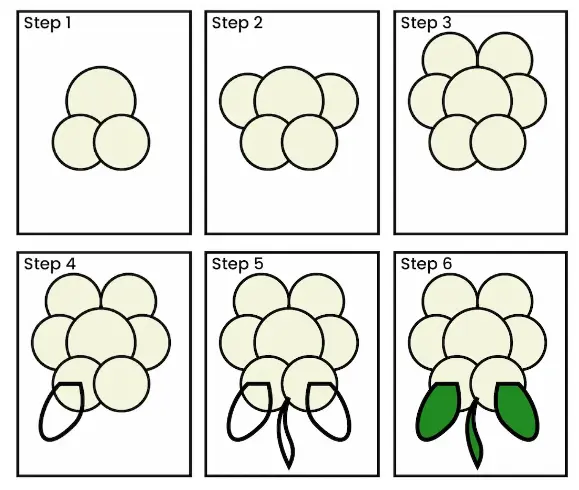
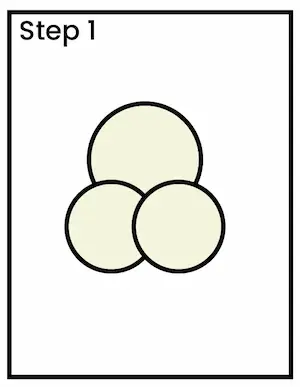
Step 1: Create the Basic Outline of the Cauliflower
Start by creating a big, rounded shape that resembles an oval. This will be the upper section of the cauliflower head. Cauliflower has a fun, bumpy shape, so feel free to make your shape a bit wobbly to show off its unique style!
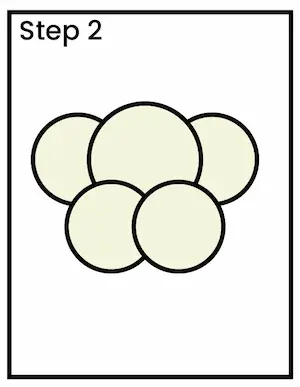
Step 2: Make the Florets’ Texture Fun!
Inside the big oval, begin sketching tiny, rounded bumps all around the surface. These little bumps are the tiny flowers of the cauliflower. Don’t stress about being super exact—cauliflower has a fun, organic vibe, and the more playful your bumps, the more it will feel like nature!
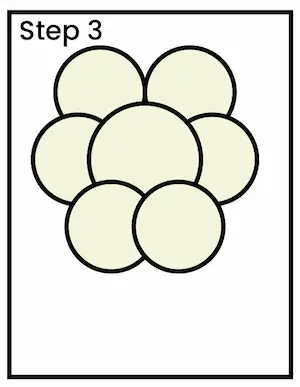
Step 3: Toss in the Cauliflower Stems and Leaves
At the bottom of the cauliflower head, sketch the sturdy stems and playful leaves that hug the vegetable. The leaves are big and round, spreading out from the bottom of the cauliflower. Be sure to layer some leaves for a more lifelike look!
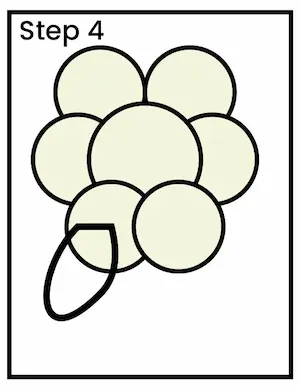
Step 4: Make the Leaves Extra Special
Now, give the leaves some character by drawing lines from the bottom to the top of each one! These lines can be a little wiggly and spread out as they move along. This detail will make the leaves look more lifelike and fun!
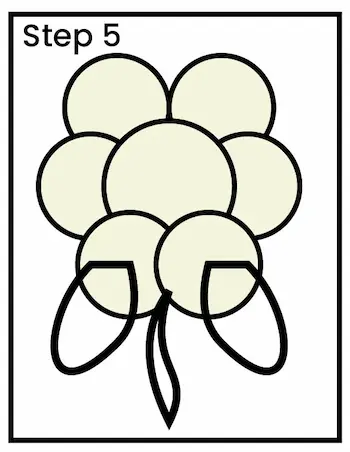
Step 5: Perfect the Petals
Return to the upper section of the cauliflower and smooth out the uneven surface. Add extra tiny, round shapes on top of the ones you’ve made, and sprinkle in some light shading between the blooms to help them pop and appear more three-dimensional.
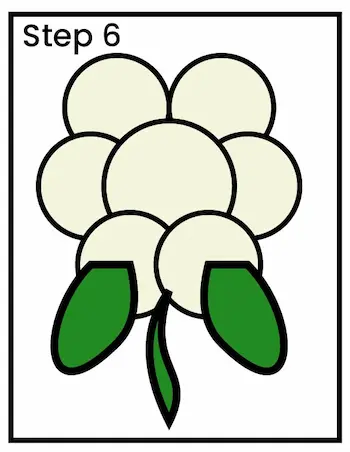
Step 6: Give the Cauliflower Head Some Color
To make your cauliflower drawing look more real, try adding some shading to the surface of the florets. Gently add some color between the bumps to make the cauliflower look more interesting. You can also make the spots where the leaves touch the flowers a bit darker to create shadows.
Step 7: Add Some Color to the Cauliflower
Let’s get ready to add some colors! Choose a soft cream or pale shade to color in the cauliflower head. You can use a bit of a darker color for the shaded spots between the flowers. For the leaves, use a variety of green shades—lighter green for the outer edges and darker green for the inside and veins.
Step 8: Sprinkle in Some Bright Spots and Dark Areas
To make your cauliflower more fun, add some bright spots to the tops of the florets where the light would naturally shine. This will give it a playful look! Include deeper shadows between the blossoms and at the bottom of the foliage for a more lifelike appearance.
Step 9: Make a Fun Background (Optional)
To finish your cauliflower drawing, you can include a fun background! For instance, you might display your cauliflower thriving in a garden surrounded by soil and other plants, or you could arrange it on a kitchen counter alongside other vegetables. Including background elements will enhance the appeal of your artwork.
Find Motivation
Here are some fun ideas to spark your creativity when sketching cauliflower:
Check out a Farmers’ Market: Getting up close to cauliflower lets you really see how it looks and feels! Visit a market or grocery store to see real cauliflower in person.
Check out the fun drawings of food! Check out cookbooks or food magazines to discover how artists create drawings and paintings of cauliflower. This can spark your imagination on ways to include shading, texture, and color.
Cartoon Cauliflower: If you enjoy animated stories, consider how you can transform a cauliflower into a fun character by adding eyes, a mouth, and other playful features. Colorful illustrations are a delightful and imaginative method to make vegetables come alive!
FAQs: How to Sketch a Cauliflower
- Is cauliflower tricky to sketch?
Cauliflower might look a bit complicated with its bumpy surface, but if you take it one step at a time, it gets a lot simpler! The secret is to concentrate on sketching the lumpy petals and including fun details like leaves and shadows. - What colors are best for cauliflower?
Cauliflower often comes in a soft cream or white color, with some lovely green shades for its leaves. Choose a soft, creamy color for the petals and rich, vibrant greens for the leaves below. - What are some tips to enhance the realism of my cauliflower drawing?
To make your cauliflower drawing pop, try adding some shading between the little bits and on the green parts! Use bright spots to show where the light shines and darker areas to create a sense of depth. - Is it possible to create a drawing of cauliflower alongside other veggies?
Absolutely! Cauliflower is super fun to draw when it’s hanging out with other colorful veggies like broccoli, carrots, or tomatoes! You can make a whole garden picture or a fun drawing of veggies. - What can I do if I mess up while drawing?
It’s okay to mess up sometimes, just have fun with it! Grab your eraser to make it right, or transform that oops into something fun and imaginative! Creating is all about trying new things, so keep exploring and enjoy yourself!
Case Study: Fun with Cauliflower Art in Class
In a fun art class about nutritious foods, young artists were excited to draw various vegetables, including cauliflower. The teacher guided them through the steps of drawing the cauliflower head and leaves, and they were encouraged to add their own creative touches.
Outcome: Enhanced Observation Skills: Learners discovered how to pay attention to tiny features such as the cauliflower’s uneven surface and the patterns in the leaves.
Imagination in Art: While many used standard colors, a few opted to create vibrant, whimsical cauliflower drawings featuring bold hues and playful backgrounds.
Discovering Vegetables: As a fun addition, students also explored the nutritional benefits of cauliflower and why it’s important for a healthy lifestyle.
Conclusion
Drawing cauliflower is a delightful and fulfilling activity that allows young artists to explore shape, texture, and shading techniques. With its fun shape and easy-to-draw features, cauliflower is a fantastic inspiration for little creators. By following this step-by-step guide, young artists can create their own cauliflower drawings, whether they’re sketching it in a garden, on a plate, or as a playful cartoon character. So pick up your crayons, and let’s begin sketching this healthy veggie!

