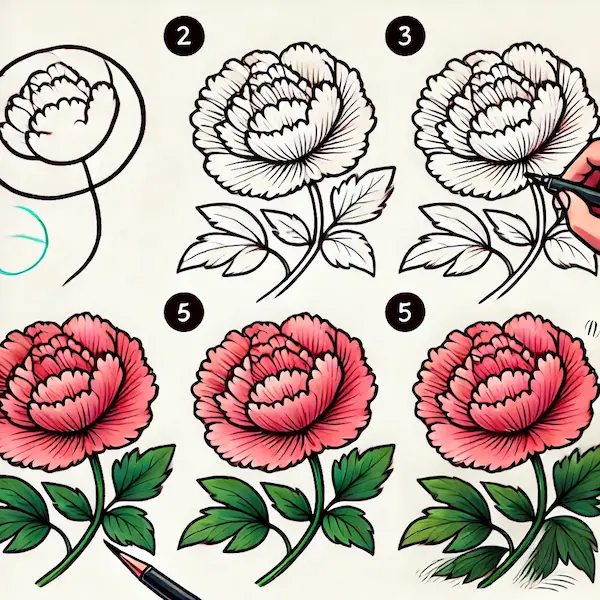
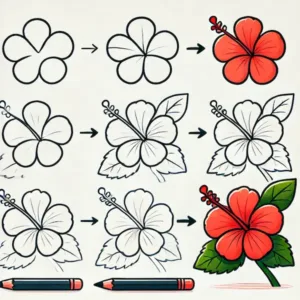
Peonies are celebrated for their vibrant, abundant blossoms and soft petals, capturing the hearts of flower lovers everywhere. Their vibrant colors and unique shapes can seem intimidating to draw, but with the right approach, young artists can create beautiful peony drawings in no time! This guide on how to draw a peony will provide a step-by-step tutorial that simplifies the process and makes it fun! This guide is ideal for little creators excited to dive into art projects at home or enjoy a fun activity in the classroom.
Table of Contents
Supplies Utilized
Before jumping into the drawing fun, collect these materials to make sure everything goes smoothly and is super enjoyable:
- Paper: Use any kind of drawing paper, ideally in white or a light shade.
- A regular HB pencil for drawing will be just right.
- Wipe away any oopsies or polish up the little things.
- Colored Pencils/Crayons: Pink, white, yellow, and green are fantastic colors for peonies, but little ones can use any shades they prefer.
- Black Marker (optional): Perfect for outlining the final drawing to make it stand out!
Ideas for Peony Artwork
Daisies can be drawn in a variety of fun themes, encouraging little ones to unleash their creativity:
- Garden Scene: Design a lively garden bursting with a variety of colorful flowers, featuring peonies, fluttering butterflies, and buzzing bees.
- Bouquet: Create a lovely arrangement of peonies in a fun vase, highlighting how they can be mixed with other colorful blooms.
- Fantasy Flower: Inspire young minds to unleash their creativity by designing a playful peony with vibrant colors and imaginative patterns.
- Peonies in Different Seasons: Show how these lovely blooms might appear in the cheerful springtime or as a delightful addition to a cozy winter display.
Simple Guide on How to Draw a Peony for Young Artists
Follow these fun steps to create a beautiful peony drawing that showcases the flower’s charm!
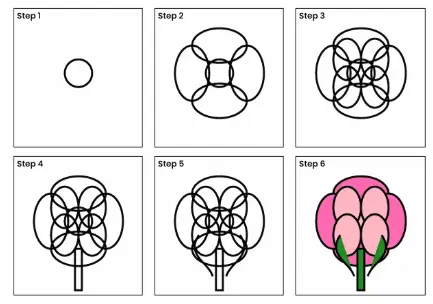
Step 1: Create the Heart of the Flower
Begin by sketching a tiny, wobbly circle right in the middle of your paper. This will be the heart of the peony. Unlike other flowers, the center of a peony is often a bit playful and fluffy, so just have fun with it and don’t stress about perfection.

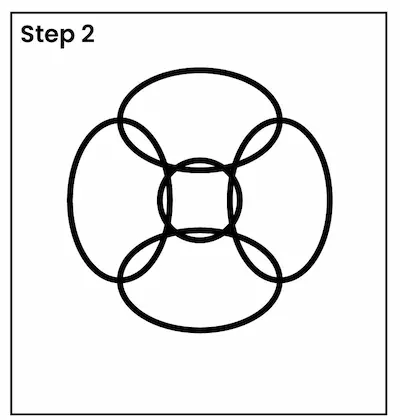
Step 2: Add the Fun Petals
From the center circle, create some tiny petals that gently curve outwards. These petals ought to be soft and gently overlapping, creating a sense of depth and playfulness. Sketch around 3-5 petals now, making sure they are near the center.
Step 3: Create the Big Outer Petals
Now it’s time to add the fun outer petals! These should be bigger and stretch out more than the smaller ones inside. Begin at the outer edges of the inner petals and create bigger, rounded shapes that gently curve outward. Try to use 5-7 of these petals to make it look more vibrant and lively.

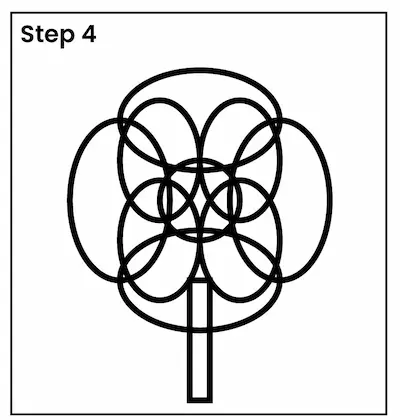
Step 4: Add More Petals for Extra Fun
To make it more fun, you can add extra petals popping out from behind the outer ones. These can be tucked away a bit to make the flower look more vibrant and full of life. Mix up the sizes a bit to achieve a more organic appearance.
Step 5: Create the Stem
Once you’re happy with the petals, sketch the stem reaching down from the flower. The stem needs to be strong and solid, getting narrower as it descends. You can make it a little wavy to give it a fun sense of action.

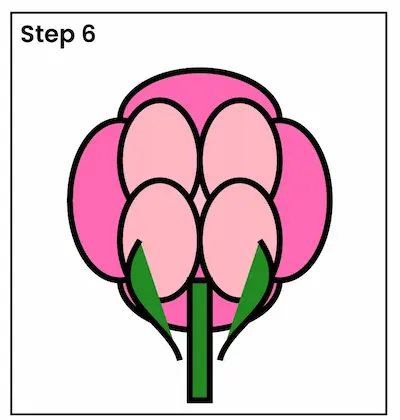
Step 6: Add Foliage
Peonies usually feature wide, playful leaves that are lobed. On both sides of the stem, add a few fun leaves. The leaves ought to be elongated and sharp, featuring a soft bend to their shape. Adding some fun vein lines inside the leaves can make them look even more interesting!
Step 7: Add Fun Details
Now, sprinkle some fun details on your peony petals and leaves! Gently draw lines that approximate the form of each petal, incorporating some playful curves and little lines. For the leaves, add vein lines to make them look more interesting and lifelike.
Step 8: Add Some Color to Your Peony
Now comes the exciting part—coloring! Peonies come in lovely shades like pink, red, and white. Play with bright and deep tones of your favorite color to create fun layers. Make the middle bright yellow or shiny gold to look like the pollen. For the leaves and stem, use a mix of bright greens to make it lively and fun.
Step 9: Include Fun Background Elements (Optional)
To make your drawing more fun and exciting, think about including some background elements! Imagine creating a bright blue sky, a vibrant garden bursting with colorful blooms, or a charming vase to showcase your beautiful peony.
Find Your Spark
Ideas for drawing peonies can spring from all sorts of places. Here are a few fun suggestions:
Visiting a local flower shop can ignite creativity, with beautiful peonies on display to admire.
Art Books: Explore vibrant art books that showcase beautiful blooms like peonies and other flowers for creative inspiration.
Exploring the outdoors: A stroll through a garden or park can offer fantastic inspiration for creative drawing activities.
Online Art Tutorials: Looking for videos or online tutorials can provide fun visual guidance and creative techniques for drawing peonies.

FAQs: Learn to create a beautiful peony drawing!
Are peonies tricky to sketch?
Even though peonies look intricate, you can draw them easily by simplifying their shapes. Following step-by-step instructions makes it easy to handle.
Which colors work well for illustrating a peony?
Peonies are often seen in shades of pink, red, white, or coral, but little ones can choose any color they like to create their own special peony.
What are some ways to enhance the details in my peony drawing?
To make it more fun, think about adding some cool patterns to the petals and leaves! Adding some fun and playful touches to curves can make things look more lively and engaging.
Is it possible to combine peonies with other types of flowers in my drawings?
For sure! Creating a colorful arrangement of peonies alongside other blooms can result in a lively and cheerful display. Little ones can combine various blooms to brighten their creations.
What if my drawing isn’t just right?
Art is a wonderful way to explore imagination and share your unique ideas! Encourage young ones to embrace their unique style, as every flower is different, and imperfections can add character to their artwork.
Case Study: Peony Art Workshop
In a fun art workshop for young artists aged 8-12, the participants enjoyed a lesson on how to draw a peony. The workshop kicked off with a fun introduction to the flower’s features, then moved on to an easy-to-follow drawing tutorial!
Result:
Skill Development: Young ones practiced their observation skills and fine motor skills while sketching the peony’s detailed features.
Imaginative Fun: Lots of participants added their own special touches to their peonies with vibrant colors and playful backgrounds, highlighting their artistic flair.
Positive Feedback: By the end of the workshop, everyone successfully completed their drawings and shared their excitement about their artwork.
Conclusion
Creating a peony can be a fun and fulfilling activity for little ones. With their unique shapes and vibrant colors, peonies offer a fantastic chance for little creators to dive into their imagination. This easy-to-follow guide makes drawing fun and accessible, allowing young artists to create stunning peony artwork effortlessly. So, gather your supplies, let your creativity flourish, and have fun on the colorful adventure of drawing a peony!

