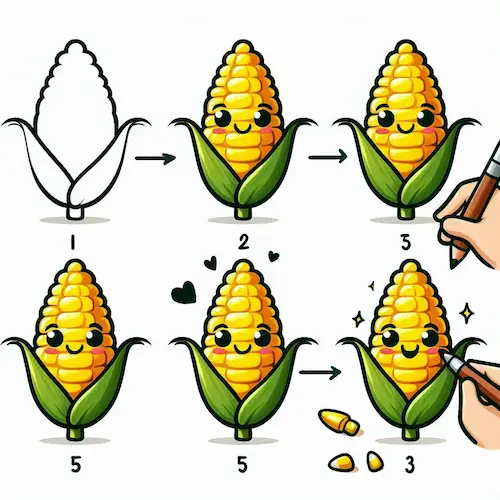
Drawing sweetcorn is a super fun way to explore different textures, play with shading, and create cool organic shapes! With its colorful layers and fun shape, it might look tricky at first, but taking it step by step can turn it into a fun and easy experience. Here’s a fun guide to help you draw a colorful and eye-catching ear of sweetcorn, covering everything from the basic shape to adding playful details.
Table of Contents
Step by Step Sweetcorn Drawing
Part 1: Exploring the Fun Parts of Sweetcorn
Sweetcorn consists of three key components:
- The main part with rows of little pieces
- The little pieces on the ear
- The leafy part that wraps around the ear
Figuring out how these parts fit together will make it easier to plan your artwork.
Part 2: Kicking Off with a Simple Framework
1. Sketch the Ear
Start by gently drawing a tall, rounded shape. This will show the central part of the sweetcorn. Adjust the oval to be a bit slimmer at the top and bottom, mimicking the natural shape of corn on the cob.
2. Sketch the Shell
Draw a couple of wavy lines around the oval shape. These are the leafy parts that cover the corn inside. Make sure the leaves gently curve outward from the base and come to a point that angles away from the main ear. The outer layer should appear to be softly coming off the ear, creating a look that feels organic and effortless.

Section Three: Incorporating the Kernels
1. Establish Rules for Rows
To create the kernel pattern more simply, draw soft horizontal lines across the oval, keeping them spaced evenly apart. These will help you keep everything organized and in line. Next, split the ear into vertical sections, forming a grid to assist you in lining up each kernel.
2. Create Unique Kernels
Begin by sketching tiny, circular or gently oval forms along each horizontal line. Every kernel should connect with the next one in a fun, slightly overlapping manner. Make sure each piece is about the same size, but they don’t have to be exact circles – a little variation will give it a more playful look. Start at the top and go down, filling each row with those little goodies until the whole ear is packed!

Section 4: Enhancing Dimension and Feel
1. Color the Kernels
To make each piece look fun and bouncy, add some shading to the bottom part of each one. Gently add some color to a crescent-shaped spot close to the bottom of each kernel. Grab a blending tool, such as a cotton swab or blending stump, to gently soften the shading and create a smooth appearance.
2. Make Fun Highlights
For a fun touch, leave a little sparkle at the top of each kernel where the light would naturally shine. An eraser can help you remove tiny areas for highlights if you want to add some fun touches. If you’re having fun with colors, give a light yellow or white pencil a go for those bright highlights!
3. Shade the Spaces Between the Pieces
To make each kernel stand out even more, color in the little gaps where they join together. This shading will create a sense of dimension and make the kernels appear snugly clustered, just like on genuine sweetcorn.

Part 5: Creating and Adding Depth to the Husk
1. Make the Husk More Interesting
Begin by gently sketching delicate lines along each leaf to depict the natural veins and folds. These lines should follow the shape of the leaf. You can make the outer layer look bumpier or smoother based on how much detail you include.
2. Add Depth to the Husk for a Lifelike Effect
Color the outer edges of the husk leaves a bit darker, while leaving the center lighter to create a sense of roundness. To create a fun and dynamic appearance, include extra shading in the areas where the leaves overlap or bend.
3. Include Little Touches
Add tiny wrinkles and little flaws on the leaves, particularly close to the bottom of the husk where they connect to the ear. To make it look more authentic, add a few delicate strands of corn silk (the thin fibers that usually stick out from the top of the ear) gently showing from the top.

Part 6: Adding Color to Your Sweetcorn
If you’re looking to brighten things up, here are some fun tips for a lively, true-to-life appearance:
1. Pick Your Colors
For the kernels, pick bright shades of yellow and gold, adding in some deeper yellows or light browns for extra dimension. For the outer layer, use bright greens, cheerful yellow-greens, and a hint of brown to create some fun variation.
2. Stack the Hues
Begin with a soft shade of yellow for the kernels and a gentle green for the husk. Slowly add on layers of deeper shades, mixing them together to make soft changes.
3. Add Fun and Contrast
Grab a white colored pencil to add some bright touches, particularly on the kernels. For shadows, choose a deep brown or a rich dark green for the spaces between kernels and beneath the folds in the husk.

Section 7: Finishing Touches
1. Tidy Up Your Lines
Remove any extra guidelines, particularly around the kernels, to give the ear of corn a neat and polished appearance. Trim the edges of the husk leaves, giving them a pointed or ragged look as you like.
2. Highlight the Fun of Shadows and Bright Spots
Check your shading and highlights one more time to ensure they pop, especially if you’re using pencil.

Fun Tips for an Awesome Sweetcorn Drawing
- Have fun with Kernel Patterns
The design of the kernels repeats, so enjoy the process of ensuring each row looks just right. This will make your drawing feel more alive and relatable. - Explore Various Textures
Try using different amounts of pressure with your pencil to make all sorts of fun textures on the outer layer and the little pieces inside. A gentle approach can bring out the tenderness of the kernels, while a more vigorous method can highlight the texture of the husk. - Explore Various Art Materials
Try using colored pencils for vibrant hues, or have fun with watercolor for a gentle, artistic touch. If you’re creating on a screen, experiment with various brushes to get both sleek and bumpy effects.
Part 8: Fun Twists for Various Styles
- Imaginative Approach
Pay attention to every little detail, shading, and texture for a super lifelike appearance. Focus on detailed references and be mindful of the bright spots and darker areas. - Animated Style
Make the ear easier by using fewer rows of big, round kernels. Utilize bold outlines and vibrant colors, steering clear of intricate shading for a more polished, stylized appearance. - Fun and Colorful Style
Maintain a sense of reality while having fun with strong outlines and vibrant color differences. You can try using cross-hatching for shading or add fun patterns to the husk for a cool appearance! - Colorful and Soft Style
Choose gentle, mixed hues for a whimsical touch. This approach focuses more on the big picture and the fun of shapes and colors rather than getting caught up in the tiny details.
Getting Better at Drawing Sweetcorn
Don’t feel down if your first few attempts aren’t just right – drawing corn can be a fun challenge with all its cool textures and patterns! Check out these fun activities to boost your abilities:
- Sketch Only the Kernels: Work on drawing lines of kernels, leaving out the husk to concentrate on their form and shading.
- Explore Various Husk Shapes: Play around with different shapes and placements of husk leaves to discover how they alter the appearance of the corn.
- Explore Real Corn: If you can, check out a real ear of corn or look at pictures to observe how light and shadow play with the textures.

Drawing sweetcorn is a fun way to practice your skills in texture, shading, and detail work. By breaking down the process into fun steps and enjoying each stage, you can create a colorful, lively drawing of sweetcorn that showcases its delightful texture and bright hues. Have fun and keep creating!


