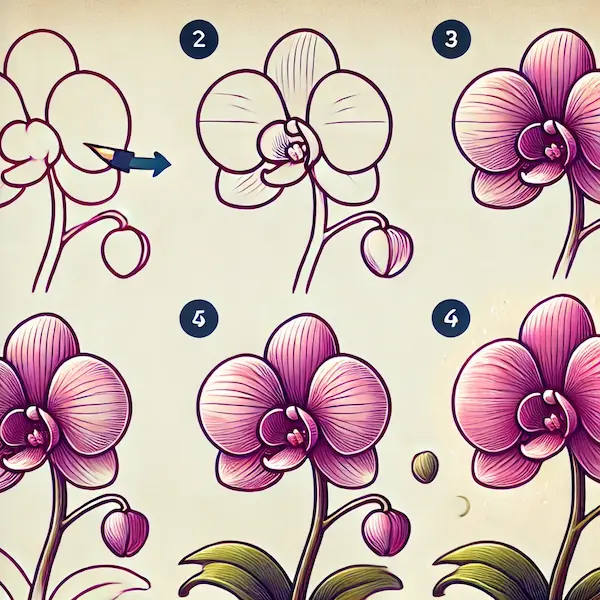
Orchids are such stunning and unique flowers, bursting with vibrant colors and interesting petal shapes that make them truly special. They may seem intricate, but sketching an orchid can be easy and fun, particularly for young ones! This blog post will guide you through a delightful and simple tutorial on how to draw an orchid. With a fun and easy-to-follow method, we’ll ensure that even those just starting out can beautifully depict this flower. By the end of the lesson, they’ll have created their very own orchid masterpiece!
Items Utilized
Before you start, collect these materials to make the drawing fun and easier:
Any kind of drawing paper is great, but a nice smooth white sheet is the best choice.
Start with an HB pencil for your drawings, and think about using a 2B pencil to make those darker details pop!
A fun eraser can help tidy up little oopsies or make the drawing even better!
Coloring Supplies: Orchids are available in many vibrant colors, so gather various shades of purple, pink, and white for your creative projects.
Black Marker (optional): To outline your creation and make it stand out!
Themes for Orchid Drawing Orchids are versatile and can fit into different creative themes, providing young artists with plenty of options to explore:
In the lush, vibrant tropical jungle, you’ll find that orchids thrive beautifully in the warm, humid environment. Include more fun elements like swinging vines, colorful birds, or fluttering butterflies.
Indoor Garden: Lots of folks enjoy nurturing orchids in pots inside their homes. Creating a picture of a flower in a fun pot brings a cozy vibe to the art piece.
Abstract Flower: Young artists can create an orchid with whimsical or fantastical elements, experimenting with vibrant colors and unique shapes.
Nature Study: A fun theme where young ones can draw orchids with labels or diagrams, just like they are exploring the world of plants.
Step-by-Step Instructions on How to Draw an Orchid for Young Artists
Now, let’s jump into the exciting part—drawing your orchid! Follow these fun steps to make a lovely orchid flower!
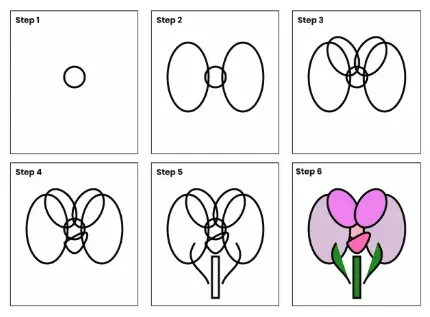
Step 1: Create the Heart of the Flower
Begin by sketching a tiny oval right in the center of your paper. This will be the fun part of the orchid, where the petals spread out like arms reaching for a hug. The middle of an orchid usually resembles a little cup or heart shape, so you can include a tiny “V” shape at the bottom of the oval to imitate this.

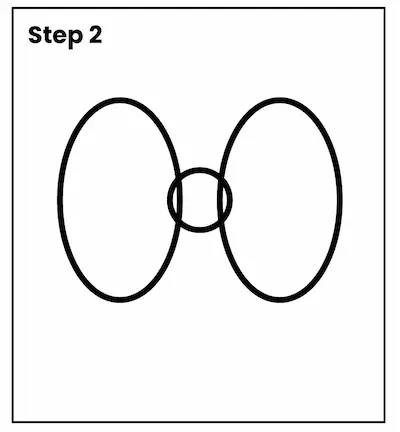
Step 2: Create the First Petal
From the center oval, create a big petal at the top. Orchid petals are often soft and rounded, spreading out in a delightful way. The top petal is often the star of the show, so give it a little extra size compared to the rest!
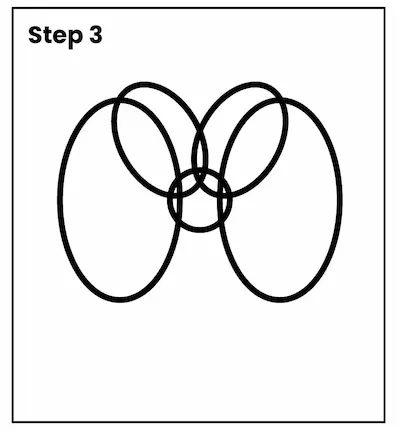
Step 3: Attach Two Side Petals
Next, create two lovely petals on each side of the center, spreading out in a fun diagonal way. The petals need to be similar in size to the top one, but they should angle outwards. The edges can be a bit wavy or rounded because orchid petals have a graceful, flowing shape.
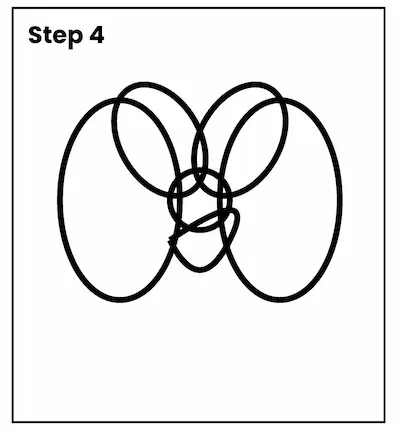
Step 4: Create the Bottom Petals
Now it’s time to create the lower petals. Orchids usually feature two bigger petals at the bottom, which are a bit longer and more pointed compared to the side petals. These petals should gently bend downwards, forming a lovely, even shape.
Step 5: Make the Stem
After you’ve drawn the petals, let’s move on to adding the stem! Sketch a slender, elongated stem extending downward from the heart of the orchid. Orchids usually feature long, graceful stems that hold up their beautiful blooms.

Step 6: Add Foliage
Orchid leaves are wide and sleek, so sketch a pair of elongated, gently curved leaves sprouting from the bottom of the stem. These leaves should curve a bit to the sides. You can also add a few tiny, round buds along the stem to show that more flowers are getting ready to bloom.

Step 7: Sprinkle Some Fun and Whimsy on the Petals
To make your orchid look even more lifelike, try adding some lines inside the petals. These lines should trace the outline of each petal, beginning at the center and extending outwards. You can also sprinkle a few tiny dots or fun texture marks around the petals’ base to imitate the playful spots or stripes that some orchids showcase.
Step 8: Add some vibrant hues! Your special flower
Orchids are available in many fun colors, like bright purple, cheerful pink, pure white, and sunny yellow! Pick a color that you like, and gently fill in the petals with it. Make sure to apply gentle shading to create a delicate, natural appearance for the petals. The middle of the flower often has a different shade, so be sure to include a fun contrasting color there!
Step 9: Include Fun Background Details (Optional)
If your little one wants to elevate their artwork, they can include some fun background details. Think about adding more colorful flowers on the stem, a vibrant jungle backdrop, or even a fun flowerpot to finish off the picture.
Find Motivation
Young artists can discover ideas for sketching orchids from a variety of places. Here are some fun suggestions:
Flower Shops: Check out a nearby flower shop or nursery and explore the beautiful orchids they have on display. Snapping a photo can be super helpful for looking back and remembering things.
Online Photos: Explore a colorful collection of orchid images on the web. There are countless colors and types to spark creativity in various drawings.
Nature Documentaries: Enjoying shows about vibrant tropical plants or flowers can inspire creative ideas for drawing lifelike orchids.
Art Shows: Well-known creators such as Georgia O’Keeffe have chosen orchids as the focus of their artwork. Observing their creations can motivate young ones to infuse their own creative flair into their artwork.
FAQs: Steps to Create a Beautiful Orchid Drawing
Are orchids tricky to sketch?
Orchids may seem intricate, but if you simplify the flower into basic shapes and follow easy, step-by-step instructions, they become really fun to draw! With practice, they will find them manageable and fun.
Which colors are best for my orchid?
Orchids are available in a variety of vibrant colors, such as purple, pink, white, and yellow. Little ones can play around with various colors or pick a true-to-life hue depending on the kind of orchid they prefer.
Is it possible for me to illustrate orchids in pots rather than on a stem?
Absolutely! Creating a picture of a flower in a pot adds a fun twist to the artwork! Simply sketch a tiny pot at the base of the stem and include some extra leaves or soil for added detail.
What are some fun ways to make my orchid drawing look more lifelike?
To make your orchid drawing more lifelike, concentrate on incorporating details such as texture lines on the petals, gentle shading, and vibrant colors in the flower’s center. Additionally, look at real orchids or images to understand the special shape of their petals.
What can I do if my orchid appears lopsided?
It’s totally fine if your orchid petals aren’t perfectly even! Orchids are wonderfully quirky, with each flower boasting its own special shape. Just have fun making changes and tweaking things as you go, and remember, it’s all about enjoying the process, not perfection!
Case Study: A Fun Flower Drawing Workshop
In a creative session for young artists aged 8-10, the participants were led through the process of drawing an orchid with these easy-to-follow steps. The session kicked off with a fun introduction to orchids, chatting about how they look and all the different colors they come in. Then, every little one followed the steps to make their very own version of an orchid.
Outcome: Skill Development: Numerous young learners enhanced their grasp of symmetry and learned to create intricate shapes by deconstructing them into more manageable parts.
Imagination: Many young learners infused their projects with unique elements, such as vibrant orchids or playful backdrops, highlighting their personal flair.
Boosted Self-Esteem: Even with some worries about the flower’s intricacy, everyone finished their drawings and felt proud of what they created.
Conclusion
Creating an orchid can be an enjoyable and fulfilling activity for young ones. With its graceful petals and vibrant colors, the orchid is a delightful subject that encourages little creators to dive into the wonders of nature and unleash their imagination. With this fun and easy guide, little ones can discover how to draw an orchid while enhancing their creative abilities. This drawing exercise is perfect for a school project or a delightful afternoon activity, guaranteed to spark joy and creativity!

