Drawing a ladybug can be a fun and enjoyable experience due to its simple and charming design. With its vibrant red shell, contrasting black spots, and small legs, a ladybug is not only incredibly cute but also provides a wonderful opportunity to explore basic shapes and colors in art. In this guide, we’ll take you through the process of drawing a ladybug, paying close attention to its unique characteristics and incorporating some playful elements. Let’s dive right in and create an adorable ladybug masterpiece!
The Delight of Sketching Basic Forms
Ladybugs are great for practicing simple shapes. Their plump physique and perfectly balanced structure make them a perfect choice for both novice and seasoned artists. By emphasizing simple shapes, you can create a bright and joyful drawing that perfectly captures the charm of these delightful creatures.
The Joy of Incorporating Vibrant Hues and Intricate Designs
Adding vibrant colors and distinctive spots to a ladybug is truly exhilarating. The combination of the vibrant red shell and the contrasting black spots adds a visually captivating element to your drawing, making it truly eye-catching. Exploring different colors and patterns can add a fun and fulfilling element to the drawing process.
Discovering the Fascinating World of Ladybugs Through Art
Creating a ladybug illustration not only helps improve your artistic abilities, but also provides an opportunity to gain knowledge about these captivating creatures. Ladybugs are helpful little creatures in gardens, renowned for their appetite for pests such as aphids. Creating art of a ladybug allows you to appreciate its important role in nature while also enjoying the process of drawing!
Steps: How to Draw a Ladybug
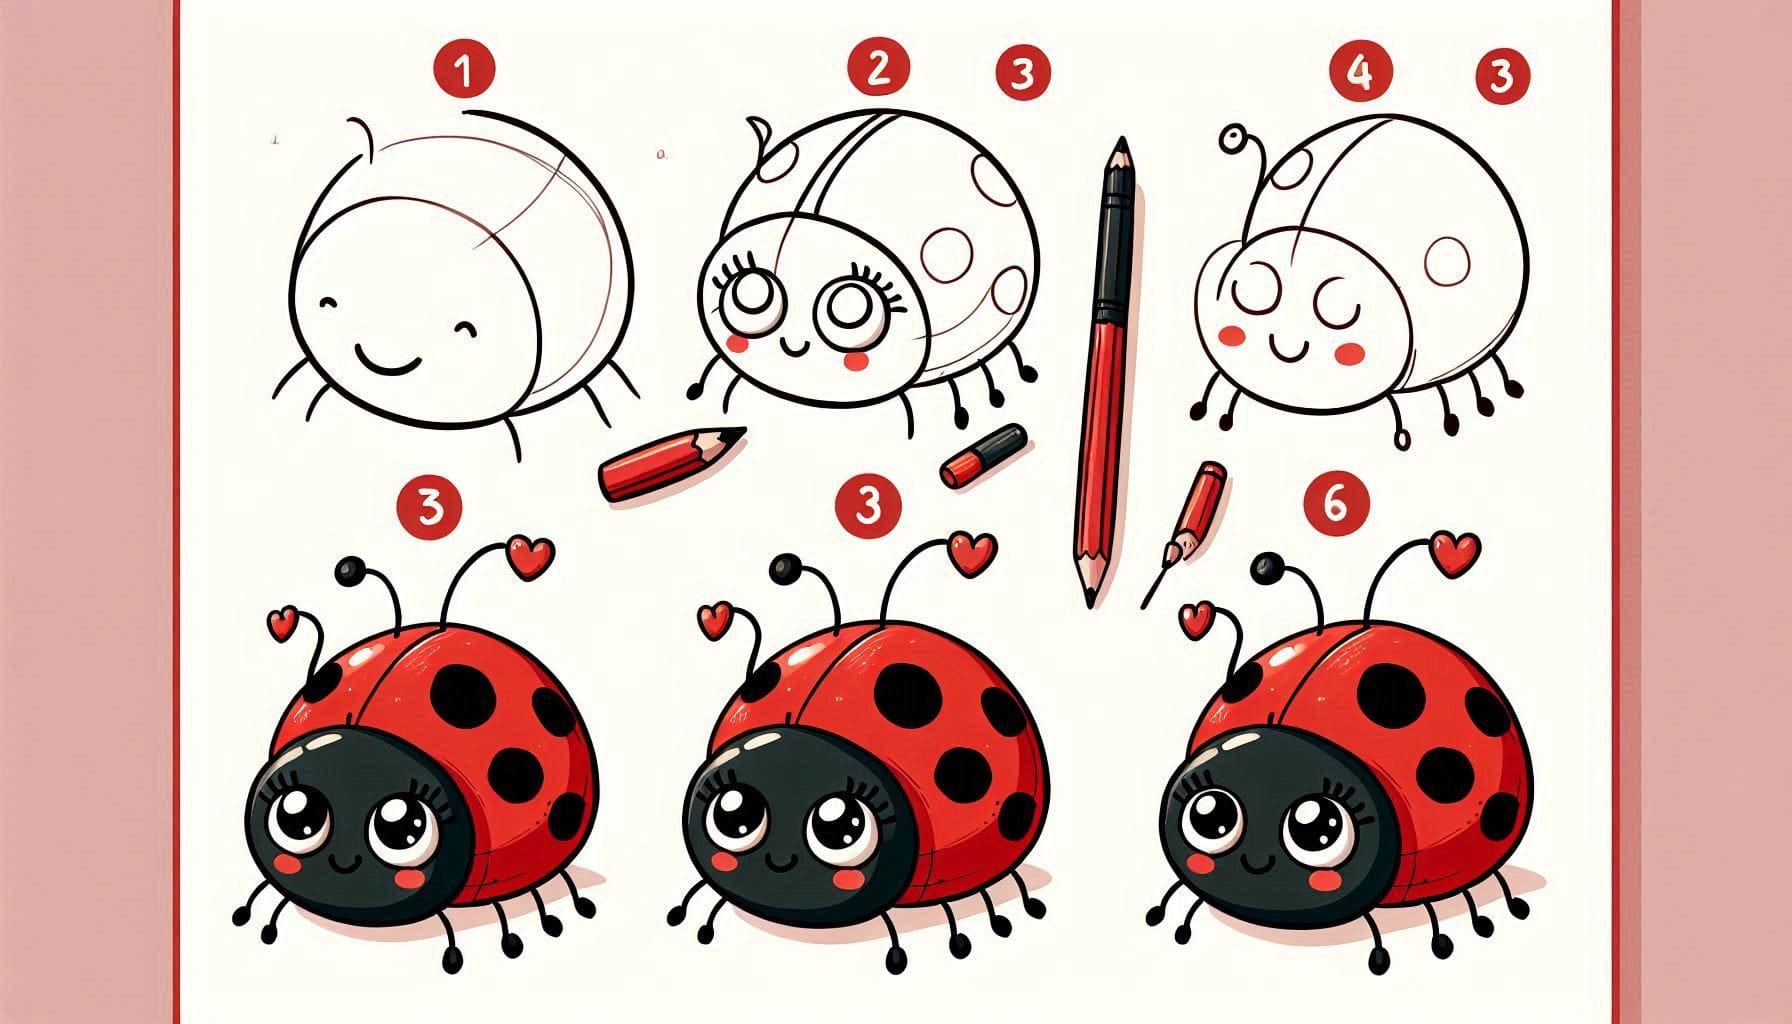
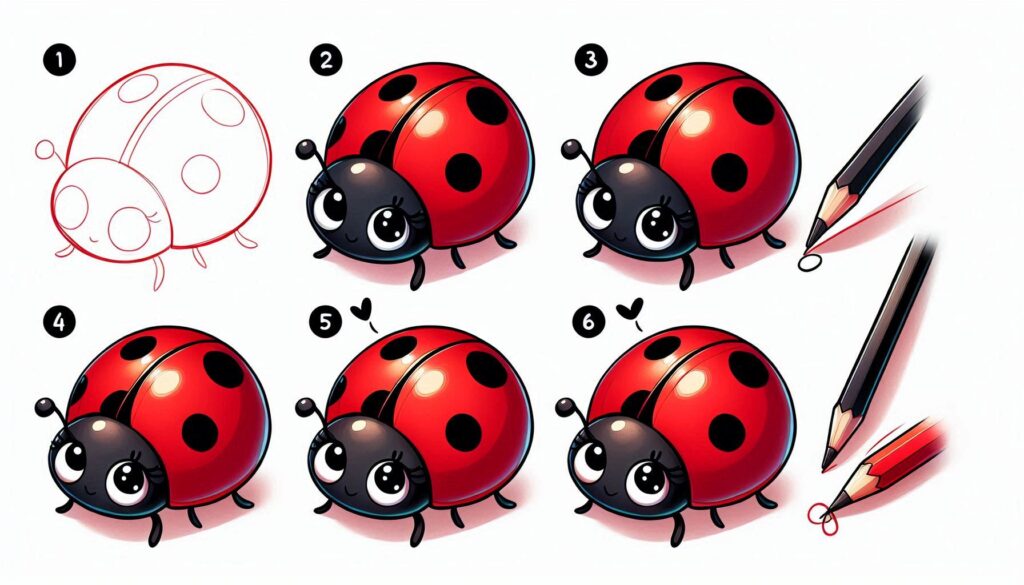
First, start by drawing the main body.
Begin by sketching a sizable oval shape to form the body of the ladybug. The oval shape can be slightly rounded at the top and flatter at the bottom to form the main shape of the ladybug’s shell. Make sure to leave enough room at the top of the oval for the head and antennae.
Next, we can move on to the next step, which involves adding the head.
Create a small, slightly rounded shape at the top of the oval to depict the ladybug’s head. This shape should be smaller than the body and should overlap slightly with the top of the oval. You can include two small curved lines extending from the head to depict the antennae.
Step 3: Add the spots
Draw several small, evenly spaced circles or ovals on the body of the ladybug to represent the spots. Ladybugs usually display a pattern of spots on their vibrant red shell. The spots can be arranged in a way that is visually pleasing to you. Ensure that there are a few spots on both sides of the body to achieve a well-balanced appearance.
Step 4: Attach the legs
Add six tiny legs to the sides of the body. The legs should have a slender and gently curved shape, ending in a small rounded tip. Arrange three legs on each side of the body, ensuring they are evenly distributed and include some intricate detailing to highlight their individual sections.
Step 5: Define and perfect the form
Opt for a darker writing utensil to carefully trace over your initial sketch and enhance the ladybug’s shape. Ensure that the body, head, and legs have smooth lines, and that the spots are clearly defined. Remove any unnecessary guidelines or overlapping lines to tidy up your drawing.
Step 6: Enhance the Visual Appeal
To enhance the texture and realism of your ladybug drawing, consider incorporating delicate lines or shading on the body to depict the shell’s texture. You can also incorporate small curved lines on the spots to give a sense of depth and dimension. Take note of the light and shadow areas to add more life to your drawing.
Step 7: Add some color to your ladybug
Now it’s time to add some vibrant hues to your adorable ladybug! Opt for a vibrant shade of red to cover the entire oval shape of the shell. Make the spots black to create a bold contrast. Using a lighter shade of red or orange can add highlights to the shell, creating a polished and three-dimensional appearance.
Theme 1: Embracing the Delight of Creating Basic Shapes
Creating a ladybug can be a fun and educational activity that allows children to practice their artistic skills while producing an adorable and easily recognizable image. By emphasizing fundamental shapes such as ovals and circles, one can enhance their abilities in crafting polished and impactful designs. This method lays the groundwork for more intricate drawings down the line.
Theme 2: Embracing Vibrant Colors and Playful Patterns
The vibrant colors and distinctive patterns of a ladybug make it a captivating subject for artists. Exploring various color combinations and spot patterns gives you the opportunity to express your creativity and add a playful touch to your artwork. This theme highlights the fun of incorporating individual flair into your artwork.
Theme 3: Discovering the Fascinating World of Ladybugs Through Art
Creating a ladybug drawing offers a chance to explore the captivating world of these insects and their important place in the natural environment. Creating art of a ladybug allows you to develop a deeper understanding of its vital role in the ecosystem, all while enjoying the process of drawing. This theme emphasizes the educational aspect of art and the relationship between creativity and nature.
In summary
Creating a ladybug drawing can be a fun and fulfilling activity that involves using basic shapes, bright colors, and a sprinkle of imagination. By following the steps in this guide, you can create an adorable ladybug drawing that perfectly captures the beauty of these fascinating creatures. Have fun creating your ladybug and let your imagination run wild as you bring it to life!
For a super fun and simple guide on how to draw a dragonfly, you can find step-by-step instructions right here! This fun tutorial offers easy steps, allowing young creators to dive into their imagination while discovering these amazing insects!

