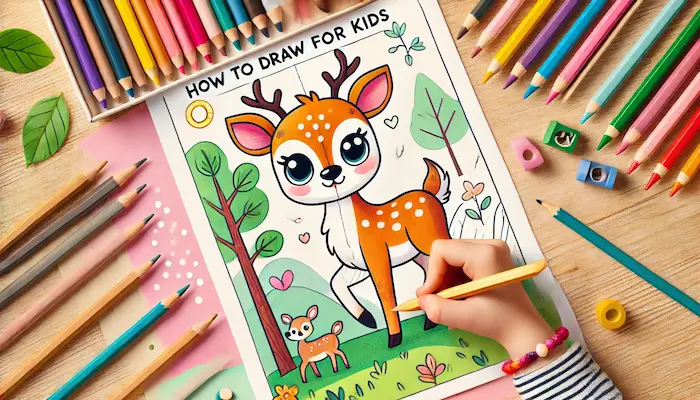
Drawing animals is a delightful and enriching activity, and deer make wonderful subjects with their graceful bodies, expressive eyes, and impressive antlers. This blog offers a fun and engaging guide for drawing a deer, featuring materials, imaginative themes, easy-to-follow instructions, and inspiration from a real-life example. Whether your little one is an aspiring artist or just loves to doodle, this activity will ignite their imagination and assist them in discovering new skills.
Table of Contents
Supplies Required
Before you begin, make sure to collect these fun items:
- Drawing Paper or Sketch Pad: Choose fun drawing paper or a colorful sketch pad!
- Pencil: For sketching, using HB or 2B pencils is just perfect!
- Eraser: Handy for fixing any “oopsies” with ease.
- Dark Marker: Ideal for tracing the final masterpiece.
- Crayons/Colored Pencils: Shades like brown, tan, white, green, and black are perfect for bringing deer and their surroundings to life with color!
- Ruler: Not necessary, but helpful for making straight lines or guides.
Fun Ideas for Drawing Deer
Adding a theme can make the drawing process more exciting and allow kids to tell a story through their art. Check out these fun suggestions:
- Magical Woodland: A gentle deer surrounded by tall trees, colorful flowers, and whimsical mushrooms.
- Winter Wonderland: A playful deer in a magical snowy forest with twinkling snowflakes and frosty trees.
- Sunny Meadow: A little fawn standing beside its parent in a sunny field.
- Enchanted Deer: Add a sprinkle of wonder with shimmering antlers and a twinkling sky.
- Animated Stag: Design a cheerful and whimsical deer with oversized eyes and a big, friendly grin.
Easy-to-Follow Guide: Sketching a Deer
Check out these fun steps to create a deer drawing! Each step breaks the process into manageable parts, making it accessible for kids of all ages.
Step 1: Create the Head Shape
- Begin by sketching a tiny oval for the deer’s head at the top center of your paper.
- Place two big, playful almond-shaped eyes within the oval.
- Just below the eyes, create a tiny triangle or a rounded shape for the nose.
- Draw a fun, wiggly line just under the nose to create a smile!
Step 2: Attach the Ears and Antlers
- Sketch two gently pointed ovals at the top of the head for the ears.
- Between the ears, sketch two branching lines to form the antlers. These can be fun and playful or more elaborate and creative.
Step 3: Create the Neck and Body
- Start by drawing two gentle, curved lines beneath the head to form the neck.
- Join the neck to a big oval or teardrop shape underneath for the body. Ensure the oval is just the right size for the head!
Step 4: Draw the Legs
- Sketch two straight or gently curved lines at the front of the body to represent the front legs. Add small rectangles or ovals at the bottom for the hooves.
- For the back legs, sketch gently curved lines extending from the rear of the body, giving the legs a bent look as if the deer is standing or walking.
Step 5: Attach the Tail
- Sketch a tiny, soft tail at the rear of the deer’s body. This can be a fun triangle or a playful rounded shape.
Step 6: Add Fun Details and Patterns
- Draw playful, wavy lines along the neck, body, and tail to make the deer look fluffy and fun!
- Add tiny dots or spots along the back and sides to show the fawn’s coat pattern when illustrating a young deer.
Step 7: Trace the Picture
- Grab a black marker and trace over those pencil lines to make the outline pop!
- Wipe away any leftover pencil marks for a tidy look.
Step 8: Bring in the Colors
- Color the deer’s body a soft light brown or tan.
- Choose a deeper shade of brown for the hooves and antlers.
- Incorporate a softer hue of brown or white on the tummy, chest, and inside of the ears.
- When creating a scene, choose bright green for the grass and trees, and opt for cheerful blue or soft grey for the sky.
Step 9: Make a Fun Background (Optional)
- Sketch some trees, flowers, or mountains behind the deer to create a lovely scene that shows where it lives.
- Incorporate playful features such as a bright sun, fluttering butterflies, or whimsical snowflakes to enhance the theme.

Real-Life Case Study: How Ethan Boosted His Confidence by Drawing Deer
Ethan, a 10-year-old, had a big passion for wildlife but often found it tricky to get his thoughts down on paper. He thought drawing deer was really tough because of their intricate antlers and body shapes. His art teacher shared a fun and easy guide, showing how to create things using simple shapes like ovals, lines, and triangles.
Ethan picked the Forest Scene theme for his drawing. He added playful trees, colorful flowers, and even a tiny stream around his deer. With crayons in hand, he filled the deer with warm browns and greens, bringing to life a lively and colorful forest scene.
When he showed his artwork to his family, they were thrilled by his imagination and hard work. This cheerful encouragement inspired Ethan to draw more animals and even begin his own wildlife sketchbook.
This case study shows how simplifying intricate drawings into easier steps and incorporating a personal touch can enhance a young one’s confidence and artistic abilities.
Frequently Asked Questions About Drawing Deer for Young Artists
Q1: At what age can children follow this guide?
This guide is perfect for young ones between the ages of 6 and 12. Little ones can join in with a bit of assistance, while older ones can contribute more details and unleash their creativity.
Q2: What are some ways to make the drawing easier for little ones?
Concentrate on the head and neck only, or create a fun, cartoonish deer with simpler features. Leave out the antlers if they look too tricky.
Q3: What if my child finds antlers difficult to draw?
Inspire them to break down the antlers into simple shapes like basic branches or wavy lines. They can have fun practicing antlers on a different sheet of paper!
Q4: What can I do to make this activity more fun and exciting?
Transform it into an enchanting tale! Pair the activity with a fun nature documentary or an exciting book about deer.
Q5: Is it possible to modify this activity for a group environment?
Absolutely! Young ones can collaborate to craft a forest mural, each illustrating their own deer in various poses and sizes to form a family or herd.
Wrap-Up
Sketching a deer is more than just a fun activity—it’s a chance for young ones to engage with the outdoors, boost their self-esteem, and unleash their imagination. This easy-to-follow guide breaks things down, ensuring that everyone can have fun while learning, no matter their age. Incorporating themes such as a snowy forest or a magical deer can enhance the experience and spark creative storytelling.
Just like Ethan, young ones can explore their creative abilities with supportive direction and encouraging feedback. Every deer drawing, whether realistic, whimsical, or cartoonish, is a special expression of imagination and deserves to be celebrated.
Every deer drawing is one-of-a-kind and filled with the imagination of the artist who brings it to life!


